Quantcast
Channel: Boba Fett Costume & Props - Prop Building Workshop
Viewing all 264 articles
Browse latest View live

Work in Progress Hand Carved Stone Boba Helmet

$
0
0
This is just a rough copy, but I wanted to share it with you folks anyway. Comments and chriticism welcome but keep in mind this is still in early stages and is only a test piece! Let me know what you think, and check out my page here
https://www.facebook.com/media/set/?...8375524&type=1
for extra info and news on my work!
Attached Thumbnails
Click image for larger version. 

Name:	fettpreview2.jpg 
Views:	N/A 
Size:	90.6 KB 
ID:	73840   Click image for larger version. 

Name:	fettpreview3.jpg 
Views:	N/A 
Size:	108.0 KB 
ID:	73841   Click image for larger version. 

Name:	fettpreview.jpg 
Views:	N/A 
Size:	142.0 KB 
ID:	73842  


Showoff Star Wars the Old Republic Mercenary Blasters (Eleena Daru's Dual Pistols)

$
0
0
This build is also documented on my website MYNOCK'S DEN, as well as the RPF, but figured I would share it here as well.

With my main character in Star Wars the Old Republic being an armed-to-the-teeth Bounty Hunter, I wanted to make myself something bounty hunter-ish. And, what better bounty hunter-ish thing to make than a blaster?

I've always liked the look of Eleena Daru, the Twi'lek in SWTOR trailer "Deceived", especially her nice pair of...

...blaster pistols (get your mind out of her lekku!). And now that I am rocking the same heaters in game, I figured I would try my hand at making this type of blaster.


I started the build process by importing a photo of the blaster into my CAD program and tracing the outline.


I then pulled the shapes of each major part out into 3D.


After about 40 hours of work (which included learning the program by following a course on Digital Tutors), I had completed my baster model.


I knew the blaster would be too big and awkward to print all as one or even two pieces, so I split the model into all the major pieces, and created a separate STL file for each part.


In the above photo, you can see I built little 1mm high walls around each object to help with adhesion to the build plate; I was having a lot of issues with the plastic curling on the build plate for several of my test prints, which almost made me tear my hair out on a few separate occasions.


So, I figured I'd experiment a bit by creating a small short wall at some distance around the object, which would increase the surface area of the raft underneath; the idea was that if curling occurred, it would happen far away from the main object, and hopefully not reach the main print in the middle.

The wall approach proved to be unnecessary in the end, as I eliminated curling/lifting completely by enclosing my printer (FlashForge Creator Dual) in plexiglass, which reduced the temperature differential across the build plate. I also increased the density of the raft base layer to 0.9 (maximum), and made the raft 3 layers thick, which stuck to the build plate like glue!


(The FlashForge Creator is based on the Makerbot Replicator 1 design, and despite the "Made in China" sticker, is an AWESOME, SOLID printer, by the way. The 92 overwhelmingly positive customer reviews and a 5/5 star rating on Amazon is what sold me on it despite me having my heart set on another machine that was twice the price. I do however baby the **** out of it, and keep my allen keys, and light-weight silicone oil close at hand. At the time of writing, I have 67 print hours on the little robot without a single hiccup that could be blamed on the printer itself. If I could change a few things about it though, I would do what I've already done - enclose 3 of the 4 sides to keep the inside nice and toasty; I would also add some LED lights like the original Replicator, to illuminate the build plate. Some have actually commented that the absence of LEDs on the Creator is an improvement over the original Replicator since LEDs in that model would sometimes short/fry the motherboard. I think I will add some battery operated LEDs in the corners of the casing, and mount a switch on the outside; I only really need the lights a few seconds at a time to check the progress of the build, so no point in hardwiring anything to the printer's own power supply).

Prior to increasing the raft settings and enclosing the printer, I also tried using the ABS soup method (ABS + acetone + smearing on kapton tape), but found that this made the object stick to the surface so bloody hard, I was afraid I would break the build plate arms trying to pry the print off. Printing in ABS at 235C with a build plate temperature of 110C using a thick, dense raft in an enclosed system I found produces no lifting or curling of plastic whatsoever! No ABS slush or hairspray products necessary!

Printing of all pieces (not including the failed-due-to-lifting test prints) took a total of 23.38 hours.


After everything was cleaned up and sanded, the assembled blaster took shape!


Next came the molding. I filled plastic container half way with plasticine, sprayed the blaster with mold release (plasticine can be a NIGHTMARE to clean off), smoothed out the surface, poked some registration holes with the blunt end of a sharpie, and sprayed the whole thing with more mold release.


Since I did not have anything other than Rebound 25 silicone left, I took a chance and decided to give it a shot. Half way through the pour, I realized "uh, oh. I'm not gonna have enough for both sides!" DOH! I poured it in anyway, figuring I'll make one half now, and the other when I get another batch of silicone.

My wife was just finishing up laundry, so I tossed the tub onto the dryer, the shaking of which would help dislodge any bubbles trapped in the silicone.


The next day, I peeled the mold out of the plastic container, cleaned off the plasticine, and viola: finished half mold.


After doing some research, I went ahead and ordered a gallon kit of Mold Star 15, a pourable Smooth-On silicone with a 4 hour demold time. Due to the tensile differences between Rebound 25 and Mold Star (which is a bit softer), I would be unable to use the Rebound 25 mold, and would therefore have to mold from scratch. *Sigh*. All that Rebound 25 . haste really does make waste.

Learning from my mistake with the Rebound 25 half mold, I decided to do a triangular mold shape rather than a square to save silicone. I built up the base layer with plasticine warmed up on the fireplace, and built up the walls using ABS sheets.


After pouring Mold Star 15, and letting it cure, the first half was done.


I then replaced the ABS walls, sealed the cracks with plasticine (some people use hot glue, though I found plasticine do the trick), and sprayed the inside with mold release to ensure that the two halves of the silicone remained separated. During this step, I picked a low-key spot on the model that would interfere with the detail the least, and created a pouring hole using plasticine.

I did not think this through very well, however, and so it proved to be yet another dumb-dumb move.


Due to the complex shape of the gun, and the overwhelming number of undercuts, the potential for air becoming trapped was extremely high. I realized the error of placing a pour hole in that spot almost as soon as I poured the silicone. Once it cured, I decided to skip the mother mold step for now, and do a test cast.

Just as I predicted, the casting came out completely ruined on one side as a result of air getting trapped.


So, I filled the pour hole with silicone, and relocated it to the butt of the blaster by cutting into the mold with a utility knife; having the mold standing up with the muzzle being perpendicular to the ground and the pour hole in the hilt would ensure even filling of the mold cavity, which would (in theory) eliminated trapped air. I have no idea why I didn't think of doing it this way first.

Next, I created the mother mold support out of Plasti Paste I. I started by building up a layer of plasticine half way up around the rubber mold, making some deep indents in the clay to act as registration keys. I then slapped on the Plasti-Paste and allowed it to cure. I then turned the thing over, removed the plasticine, sprayed mold release on, and applied Plasti Paste to the other half, creating two separate halves of the mother mold.


Finally, I was ready to cast! using a $10 set of elastic straps I bought just for this project, I assembled the two halves together, strapped them up, and poured in my Smooth Cast 65D. Once the resin began to turn white (which I could see through the top of the pour hole), I laid the mold down, and left it to cure.


Demolding revealed a near perfect casting of the Twi'lek blaster! Some air bubbles managed to stick around despite my careful pouring and mixing, but it was nothing that couldn't be fixed up with some Bondo later.

(In the next photo: original, 3D printed master on the right, with the resin clone on the left).


After removing the pour hole excess material, and using Bondo to fix up trouble spots, the blaster was ready for priming!


I printed off two more levers, each of which took 50 minutes; while these prints were going on, I cast the second blaster pistol, and got to work on prepping it for priming. Two hours later, I had both blasters primed and ready for the final paint job!


The next day, I ran over to the local Canadian Tire and picked up a few rattle cans:

(From left to right: Rust-O-Leum Satin Espressp; Dupli-Color CBGM0539 Light Blue Metallic; Dupli-Color CBTY 1625 Light Beige Met; Dupli-Color CBFM0355 Medium Wedgewood met; Krylon Colormaster Flat Black).


And behold, after several hours of painting in abysmal conditions for painting (my garage is currently +5 celsius due to the fact that we are in the middle of what seems like a nuclear winter up here in Manitoba), the blasters were finally finished!


I will do a cold cast trial version next and see how that turns out.

These blasters are the first of hopefully many upcoming Bounty Hunter style SWTOR projects I have planned.

Thanks for looking!


Question THINNER AND ENAMEL \/\/TF?!

$
0
0
Using testors Enamel... I can't find a thinner that THINS IT! I've used Weber Turpenoid & Winsor and Newton... I can't get this stuff to thin out...

where do you guys get cardboard?

$
0
0
Seems like a lot of people on the board are just using thin cardboard for their builds and seems extremely useful for all sorts of scratch building. I have some on the backs of old drawing pads, but is there a place i can go to to just buy sheets of it?

Work in Progress ROTJ SNOWBOARD HELMET!? YEAHHHHHHHH!

$
0
0
I recently went snowboarding and decided I needed to paint my snowboard helmet in a ROTJ scheme...
I started with the red as a reference point for the upper and lower pieces.

Showoff Home Made Master Shredder

$
0
0
I was breezing through pictures on my phone and stumbled upon a WiP I was going to post on Reddit. I never got around to posting the WiP, but I did Post this picture...
My GF and her 3 friends were the Ninja Turtles. Needless to say- We won every costume contest at every party we went to this past 2013 Halloween. I'll post the WiP later when I find the rest! Thanks for looking.

Question Air Brush system

$
0
0
Need help buying a airbrush system.I'm new at this so I have no idea on what to buy. Need it for weathering my ESB Fett. Seen different types of air brush systems with tanks and just compressors. Seen acouple of deals on Amazon.comThanks for the help

Storm trooper 3D wall art

$
0
0
Hello everyone I'm new here. I'm owner of a small business in north Louisiana called CNC Fabricators LLC. I make storm trooper wall decorations along with Licensed college logos out of steel plate for "man caves". Let me know what you think. Feel free to give me suggestions. You can also check out more of my work on Facebook, just look up my business name.
Click image for larger version. 

Name:	ImageUploadedByTapatalk1393174967.116213.jpg 
Views:	6 
Size:	259.5 KB 
ID:	74709Click image for larger version. 

Name:	ImageUploadedByTapatalk1393174788.534118.jpg 
Views:	10 
Size:	293.8 KB 
ID:	74704Click image for larger version. 

Name:	ImageUploadedByTapatalk1393174811.549060.jpg 
Views:	8 
Size:	292.6 KB 
ID:	74705Click image for larger version. 

Name:	ImageUploadedByTapatalk1393174836.832876.jpg 
Views:	6 
Size:	268.8 KB 
ID:	74706Click image for larger version. 

Name:	ImageUploadedByTapatalk1393174867.250302.jpg 
Views:	8 
Size:	283.6 KB 
ID:	74707Click image for larger version. 

Name:	ImageUploadedByTapatalk1393174880.799647.jpg 
Views:	8 
Size:	233.3 KB 
ID:	74708Click image for larger version. 

Name:	ImageUploadedByTapatalk1393174788.534118.jpg 
Views:	10 
Size:	293.8 KB 
ID:	74704


Sent from my iPhone using Tapatalk
Attached Thumbnails
Click image for larger version. 

Name:	ImageUploadedByTapatalk1393174788.534118.jpg 
Views:	N/A 
Size:	293.8 KB 
ID:	74704   Click image for larger version. 

Name:	ImageUploadedByTapatalk1393174811.549060.jpg 
Views:	N/A 
Size:	292.6 KB 
ID:	74705   Click image for larger version. 

Name:	ImageUploadedByTapatalk1393174836.832876.jpg 
Views:	N/A 
Size:	268.8 KB 
ID:	74706  

Click image for larger version. 

Name:	ImageUploadedByTapatalk1393174867.250302.jpg 
Views:	N/A 
Size:	283.6 KB 
ID:	74707   Click image for larger version. 

Name:	ImageUploadedByTapatalk1393174880.799647.jpg 
Views:	N/A 
Size:	233.3 KB 
ID:	74708   Click image for larger version. 

Name:	ImageUploadedByTapatalk1393174967.116213.jpg 
Views:	N/A 
Size:	259.5 KB 
ID:	74709  


Reference books /web sitesfor Star Wars Weapons

$
0
0
New to prop building and working on some sidearms based off some .44 Automag airsoft guns(adding scopes and some other greeblies...havent figured out what yet).
I know there is alot of info on how to build ee-3s, e-11s, dl-44s, but what references are there(both book and web) for the other weapons in the Star Wars universe? Just ordered a copy of the essential guide to weapons and technology, but are there any others?

I grew up during the non-special edition-episode 4,5,6,-Han shot first era, and always liked the fact the tech was based off of real weapons(sterlings, mausers, etc ) or parts there of. I'm just wanting to base my sidearms off that.

Any help would be appreciated

For Your Information THIS IS HOW FAST SMOOTH ON 320 CURES

Millennium Falcon table

$
0
0
Hi,

I'm building a Millennium Falcon table.
I finished the 3D design and now i'm thinking about which techniques to use to make the Millennium Falcon.
Click image for larger version. 

Name:	1912512_666320106743195_1704871552_o.jpg 
Views:	45 
Size:	80.3 KB 
ID:	75338

I was thinking about the following techniques:
- Outsourcing to a CNC foam milling company and finishing the model with resin(/fiberglass) afterwards
- Outsource to a 3D-print company after i made the model hollow instead of solid
- Doing it myself using Papekura (Designer) and finishing the model with resin(/fiberglass) afterwards
- ...

Which method would you recommend? Any other suggestions are welcome too!

Thanks a lot,
AG92
Attached Thumbnails
Click image for larger version. 

Name:	1912512_666320106743195_1704871552_o.jpg 
Views:	N/A 
Size:	80.3 KB 
ID:	75338  

Thermol Detonators...

$
0
0
I have a great Thermol Det. prop to wear, but I would like to display it instead of keeping it hidden in a pouch.
Has anyone found a way to hang/display a sphere with their kit?

Showoff Mando-Style Helmet Display Stand - DIY

$
0
0
Cross-posting this from my website, mynocksden.com as some of the techniques I used in making my helmet display stand could be helpful to others looking to make one themselves.

Having completed my Hunter’s Exalted Shae Vizla helmet, I realized I wanted a stand to display it on. I looked around online to find something appropriate, but nothing seemed to hook me. So, I decided to make one myself.


I began by searching the net for an image of the Mandalorian skull symbol, and having found one, I imported it into my CAD program and began manually tracing the outlines.


Once all the outlines were traced, I pulled the image out into 3D.


I then resized the model to make it approximately 21 centimetres long from tip of jaw to top of forehead, and exported it as two .STL files to be printed separately (due to printer build plate size restriction).

I converted the .STL files for 3D printing, and loaded them into my FlashForge Creator. Several hours later, I had my physical pieces.


Next, I applied Bondo spot putty to all the pieces, and sanded everything smooth.


Now I needed to make a base. I didn’t want it to be too big, or to be circular, so I rampaged through the kitchen until I found my oval slow cooker lid, and traced that onto an MDF sheet twice (for layering to achieve greater thickness.


I roughly cut out both ovals using a jigsaw (which is broken and missing the guiding base, hence the "roughly"), and glued these together using superglue.


I sanded the edges on a belt sander and gor a perfectly smooth oval.


Using Dupli-Color automotive primer I’ve come to love, I coated the base.


Now, technically, I could have skipped the molding and casting steps altogether and proceeded straight to the final assembly stage. However, I wanted the ability to reproduce the base at need (you know, to make stands for other Mando-style helmets, to use as plaque on the wall, etc), so I decided to mold the base.

I primed the 3D printed skull pieces, and glued these onto the oval base. Next, I used a thin strip of ABS plastic and some blue painter’s tape to make a wall around the base, and with a brush sealed all surfaces with Smooth-On’s Super Seal.


Next, I mixed up enough Mold Star 15 silicone to fill the little basin.


Once this cured, I peeled the silicone off, cleaned up some excess rubber, whipped up some Smooth Cast 65D, and viola! Perfect first cast!


Next, I needed to create the stalk of the stand on top of which the helmet would sit. So, I purchased a threaded rod from the local Canadian Tire. These are really inexpensive and are quite handy for all sorts of projects; they are available in 36” segments, and varying thicknesses, so I made sure to get one that was thin yet strong enough to support a helmet. I cut this in half using a hacksaw with a metal cutting blade I've had for about 5 years, and set it aside for the time being.


Next, I placed the helmet base onto my cheap little drill press, and drilled a "stand rod" hole using a 7/32 drill bit. Since the metal rod would be going into the much softer resin, the hole would self thread, thus saving the trouble of having to do it using other means.


I also had a wooden pole lying around that I got a long time ago for another project that never got off the ground. I cut a small piece off the end, drilled a hole in the middle, and screwed the threaded rod in.


First, I thought of painting the threaded rod, but then I had another idea: heat shrink tubing! You know, for that cool, rubbery look. Since I had some lying around (my garage really does have a lot of odds and ends lying around), I decided to give it a try!


I spray painted both the base and wooden bulb with Krylon gloss black, painted the mandalorian symbol a custom Testor's red I whipped up for my Revan masks, and weathered it down with some black and silver Testor’s paints. Lastly, I sealed the heat shrink tubing onto the threaded rod, screwed it into the base, and BOOM! Stand.


Thanks for looking!

P.S. To see other projects, including the production notes for the helmet shown in the photos, have a look at my website, mynocksden.com.

Question Remote speaker and sound board ideas

$
0
0
Hey everyone,

I currently have the rf lights and chest display for my ROTJ Fett hooked up to a little 9 volt battery remote switch. I was toying with the idea of trying to hook up a small speaker with a couple key fett phrases from ESB ( I know, I know not technically accurate because they are different movies but I don't want to play fett screaming like a little girl from the sarlac pit scene in ROTJ). Ideally I'd like to have the lights and the sound effects kick on from the same remote switch.

Has as anyone done something similar, or even heard of it being done? Any ideas would be appreciated.

Question General Mando Build Advice

$
0
0
I have not done a mando build before. The extent of my building experience is a small clone trooper armor set for my niece, and a few prop repaints.

My biggest question is sizing, and placement of the plates.
Im 6'3 with a skinny build, and the templates ive found are all too wide to fit properly. Should i go with a smaller chest plate template and beef up the belly plate, or just downsize it all and try and compensate with a bigger belt?

Any and all advice is helpful
Thanks!

Too cold to Resin Gaunlets?

$
0
0
A cold 35degrees in April here today. Too cold to resin Gauntlets in the shade of my garage where it's even colder?

How to fill hollow FG

$
0
0
I have an MLC1 jango bucket that has hollow FG ears. I want to fill those ears and add a threaded tee nuts to be able to screw them onto the bucket. What is the best material to pour and fill them with? Thought out kwik foam but I want something a little more solid. Epoxy? Bondo? LMK what you use, thanks

Dan

Mandalorian Costume

$
0
0
Hello Members, I am new to the area and looking to try something I have never tried. Here Are some pics for costume Ideas, Plus any help with a helmet making Ideas for this costume.Click image for larger version. 

Name:	DSC05127.JPG 
Views:	13 
Size:	70.4 KB 
ID:	76378 Click image for larger version. 

Name:	images (2).jpg 
Views:	10 
Size:	7.5 KB 
ID:	76379 Click image for larger version. 

Name:	Mandalorians_-_TEA.jpg 
Views:	14 
Size:	470.6 KB 
ID:	76380 Click image for larger version. 

Name:	review_KOTORsith04.jpg 
Views:	11 
Size:	122.6 KB 
ID:	76381 with this type of style of costume.
Attached Thumbnails
Click image for larger version. 

Name:	DSC05127.JPG 
Views:	N/A 
Size:	70.4 KB 
ID:	76378   Click image for larger version. 

Name:	images (2).jpg 
Views:	N/A 
Size:	7.5 KB 
ID:	76379   Click image for larger version. 

Name:	Mandalorians_-_TEA.jpg 
Views:	N/A 
Size:	470.6 KB 
ID:	76380  

Click image for larger version. 

Name:	review_KOTORsith04.jpg 
Views:	N/A 
Size:	122.6 KB 
ID:	76381  

Boba Fett ESB Killstripe Tutorial

$
0
0
Hi all,
I've discussed my killstripe application technique, albeit more briefly, in some of my helmet progress threads.
I had a request to put up a separate killstripe tutorial, so I'll go into a bit more detail on how I do the stripes.

I do my helmet paint jobs "topically," so this tutorial will reflect that fact. Since around 2007 or 2008, I've
probably done 14 or 15 ESB helmet commissions, and this tutorial will reflect the tweaks I've made to my
process over the years. Also, whenever I'm painting a helmet I use the topical methods, so this tutorial
will reflect that style of painting. Here goes! :)

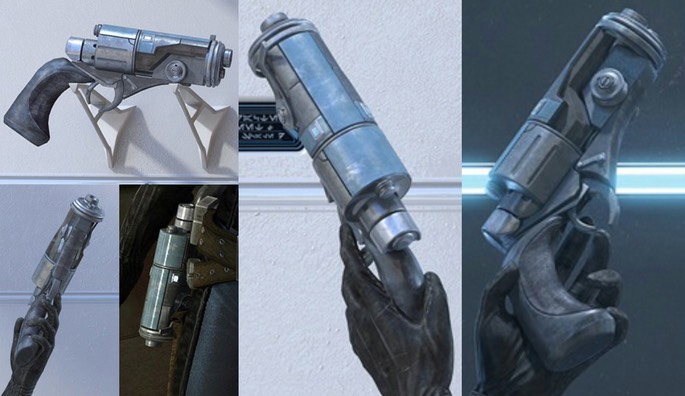
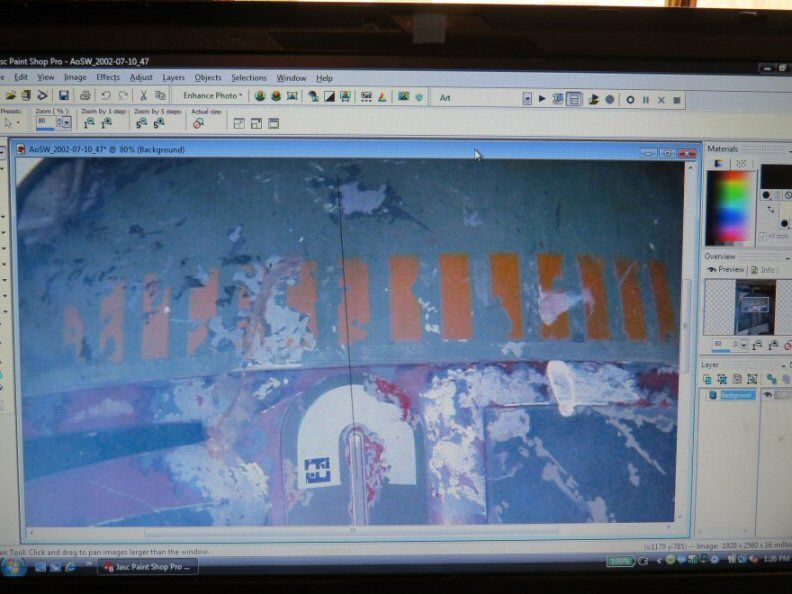
When I'm ready to begin laying out the killstripes, I always have a couple of reference pics handy. These
are invaluable during the entire helmet paint up, but checking the position and proportion of important key
features like the killstripes is really important.

Please note that any specific measurements I list here may not apply to all makes of helmet.
Each manufacturer's helmets have slightly different dimensions, so small adjustments may need to be
made depending on what type of helmet you're working on. This example uses an Animefan Deluxe kit.


The first measurement I need to get is the distance between the bottom of the killstripes and the red "band"
that surrounds the helmet. I measure a feature of the helmet, for instance the height of the band. I then
pull up a reference picture and size the picture on my computer screen until the band is the same measurement.
Then I measure that vertical space between the band and the bottom of the killstripes. In this case, that
measurement is 7 mm. I tend to work in millimeters rather than fractions of an inch when I'm doing this.
I can get greater accuracy that way.

I mark a piece of blue painters tape and slice it with an X-acto knife so I have a strip that's 7 mm wide.
Then I lay it onto the helmet.


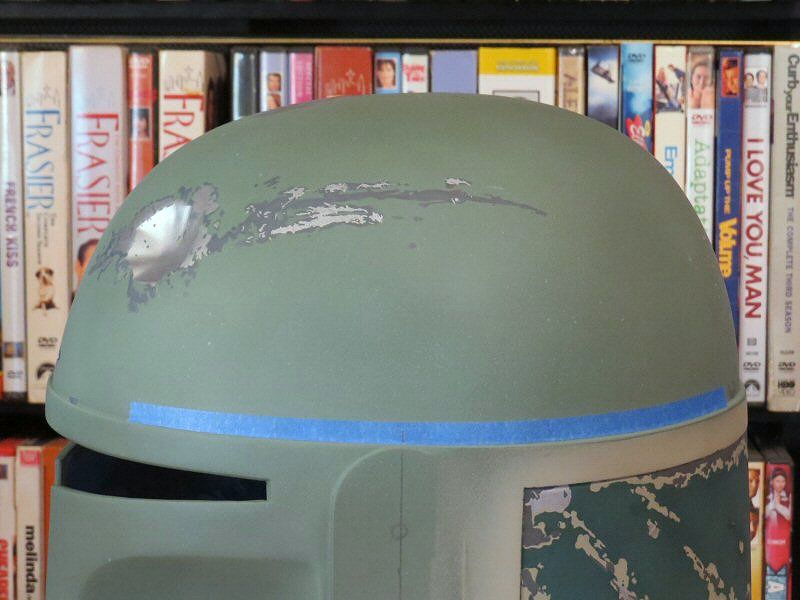
Now that this measurement is marked off, I want to find out where to begin masking the individual stripes.
In this step, it's important to find a reference pic that is oblique as possible. Meaning that you should try
to find a pic where the camera is set up so that it's at 90° to the object you want to measure. In the next
pic, I have marked a thin line running right up the center of the left ear piece so that it extends upward onto
the killstripes.


This pic shows that the #7 stripe's front edge is just forward of the centerline of the ear. So that's where I
begin marking off the stripes. I draw a pencil line on the ear platform, and extend the line up onto the blue tape.


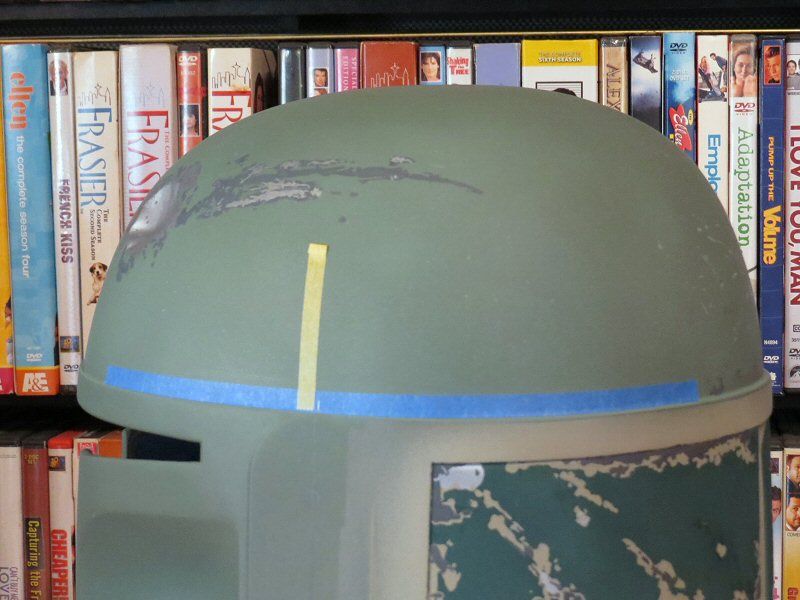
On this make of helmet, I came up with measurements of 8 mm X 25 mm for the killstripes themselves, with a
spacing of 6 mm between each stripe. Tamiya makes an excellent yellow masking tape in various widths, and
one happens to be 6 mm, perfect for this application! I place a piece of the 6 mm Tamiya tape so that the back
edge is just forward of the pencil line. Remember, the tape marks the spaces between the stripes, so if the
back edge of the tape is forward of the ear centerline, the front edge of the killstripe will be forward of the centerline.


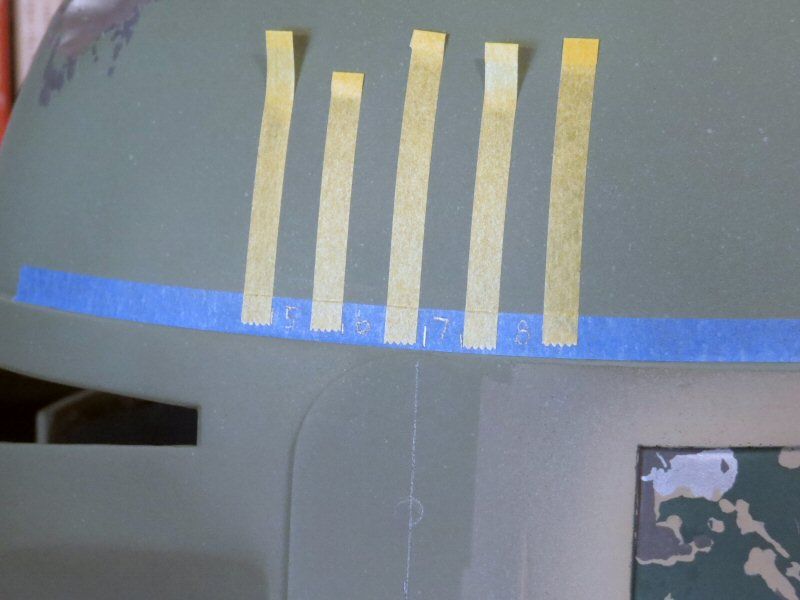
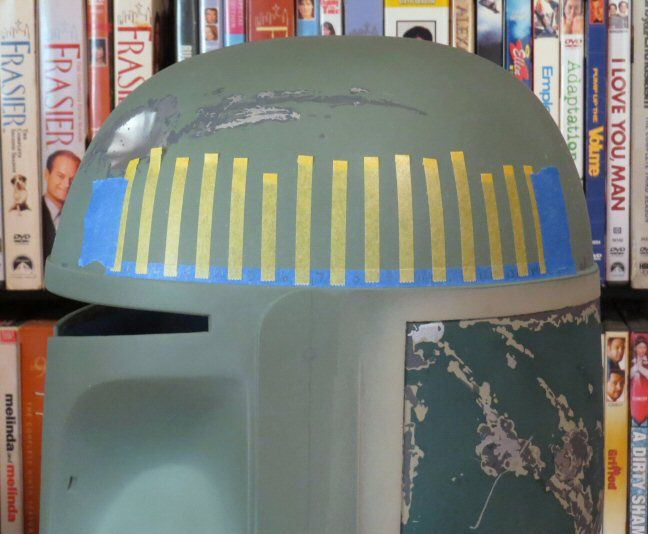
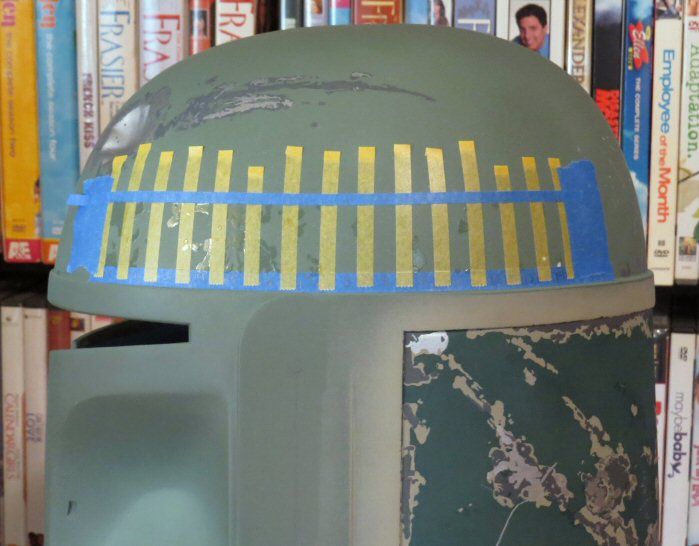
Now that I have the first space taped off, it's a fairly repetitive process to mark off the remainder of the killstripes.
I measure 8 mm from the front and back edges of that first piece of Tamiya tape, then add additional strips.


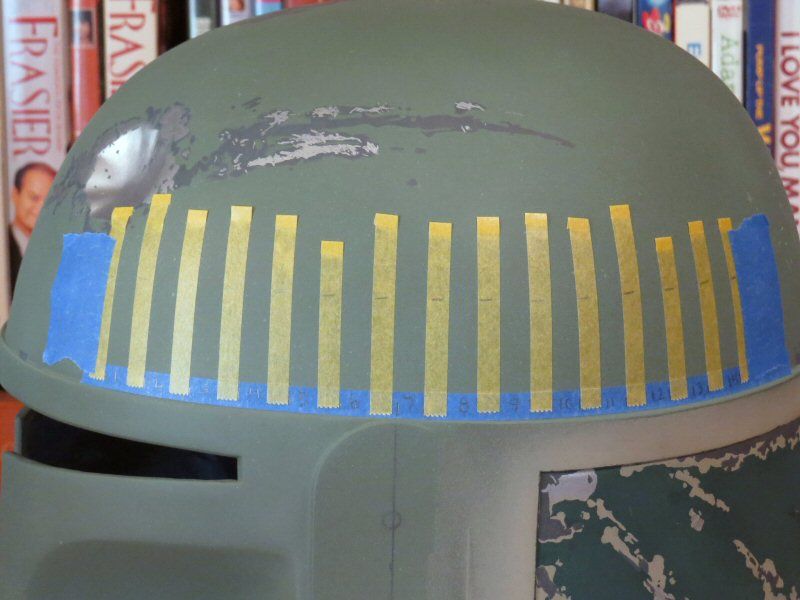
As you can see above, I write a small number on the blue tape below each stripe. This is just something I do
to help me keep track when I apply liquid mask (in a few more steps). I continue marking off the killstripes in
this manner until all 17 stripes are masked off. Aha! Caught you napping. . . there are 14 stripes of course. ;)


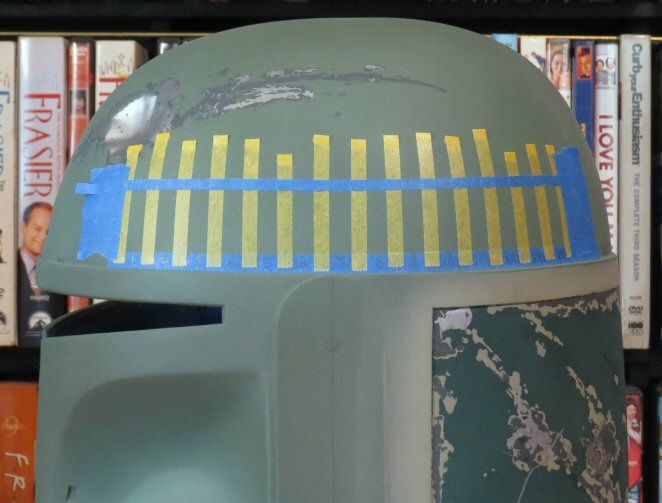
Now that the vertical spaces are defined, I need to mark off the top edge of the stripes. I place a mark on each
piece of Tamiya tape so that the stripes will be 25 mm high. It may not be necessary to mark every piece of tape.
But I do it so I'm sure I'm getting the curvature correct.


I cut another strip of blue painters tape and lay that down so it's on my pencil marks.


If Boba's killstripes were "showroom new," all the prep would be done! But they're chipped up and damaged just
like the rest of the helmet, so now it's time to mask off the chips.

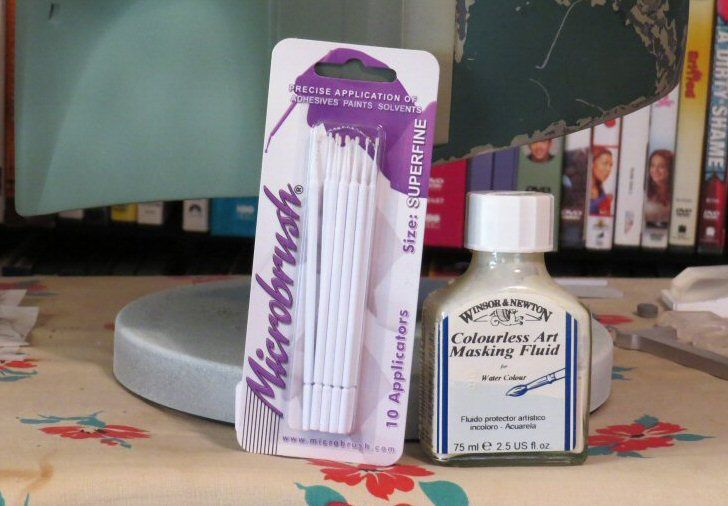
I use Winsor & Newton masking fluid for doing this type of work. There are plenty of other perfectly suitable
masking products out there, I just find that W & N suits my needs. It also goes a looooooooong way! I've been
using the same bottle for probably 4 or 5 years. To apply the fluid, I use a product called a Microbrush. They're
pretty inexpensive, disposable, and easy to use.


Microbrushes come in a couple of different sizes. I use the Superfine size for doing small work like this.
Here's a Superfine Microbrush next to a common cotton swab.

TIP: Just cut off the little tuft on the end of the Microbrush when you're done using it, and save the plastic
stick for things like mixing 2-part epoxy. Works great!


This is another area where clear reference pics, or great templates like those made by Rafalfett will really
come in handy. The patterns of chips in the killstripes are very specific, and they are one of the areas that
people will focus on when they look at your helmet, so getting them as accurate as you can is important.
Below, I've applied the masking fluid. The slightly darker, shiny spots are those chips that have been masked off.


By this point, I've done quite a bit of work to the helmet, and I don't want to risk messing up any of the detail
I've applied to the dome or back panels, so I mask off the entire helmet.


Now it's time to fire up the compressor and put that airbrush to work!
Psssshhhhhhhhhh!. . . pssssshhhhhhhhh!. . . psssshhhhhhhhhhhhhhhhhhh! (That's my airbrush sound effect.)
I use Polly Scale UP Armor Yellow for the killstripes. I apply two medium coats and I don't worry about
getting perfectly even coverage. Once the yellow has been applied, I give my airbrush a quick rinse and
immediately reload it with an orangey color. I've used a couple of different oranges, and haven't noticed
any major difference in appearance depending on which one I used. I apply a light misting coat to the rear
half of the run of killstripes, allowing it to build just slightly more toward the back. This effect should be subtle.


After allowing the paint to cure, I begin to unmask. First I remove the plastic wrap from the entire helmet.


Then I carefully peel off the Tamiya tape and the blue painters tape. I use a rubber cement pickup to remove
the dried masking fluid. It works really well. There are other ways to do it: rubbing with your fingers, using a fine
pair of tweezers to lift it off, etc. I just find that the rubber cement pickup is quick and easy.
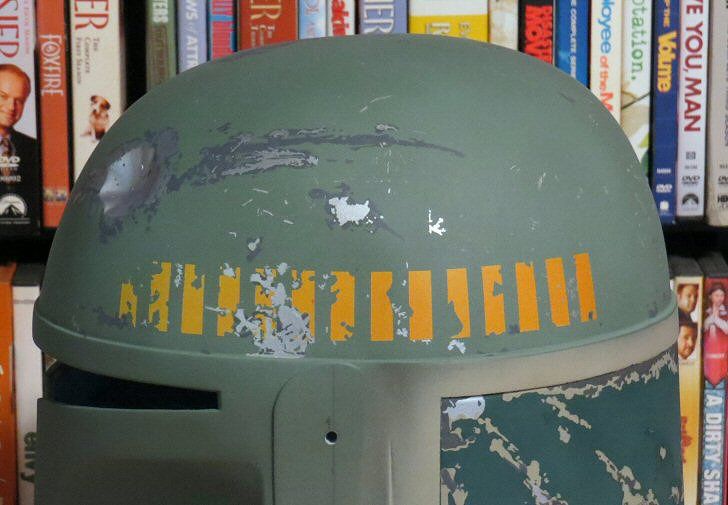
Here's a shot of the killstripes after all of the masking has been removed.

Take a look at the coloring of the entire run of killstripes. There's no definite, noticeable change from yellow
to orange. Now take a couple of fingers and hold them up to your screen so the center stripes are covered.
See the fade?


This final pic is just to show what this section of the helmet looks like after a couple more days' worth of
detail work has been done. Some of the damage areas are very closely related to the positions of the killstripes,
so that's why getting them in the right place is important.


I hope this tutorial comes in handy! As with anything, there are multiple ways of doing any part of the helmet.
I've just found that this method gives me some pretty good results. If anyone has any questions or comments,
please let me know! Now go out there and. . .

BE FETT

Casting Rangefinder Stalk

$
0
0
So I've been doing quite a bit of casting recently but I've been having issues getting a good rigid cast of my rangefinder stalks. Eventually I've been embedding a piece of aluminum in the resin as I'm casting but I was wondering if anyone else has a different method for making the stalks so they come out rigid instead of having a pliable consistency. I've been casting them in Smooth-On 320 and I've even tried 65 D but nothing seems to work as well as I'd like.
Viewing all 264 articles
Browse latest View live


Latest Images